러닝리액트 7장 컴포넌트 개선하기
7.1 컴포넌트 생애주기
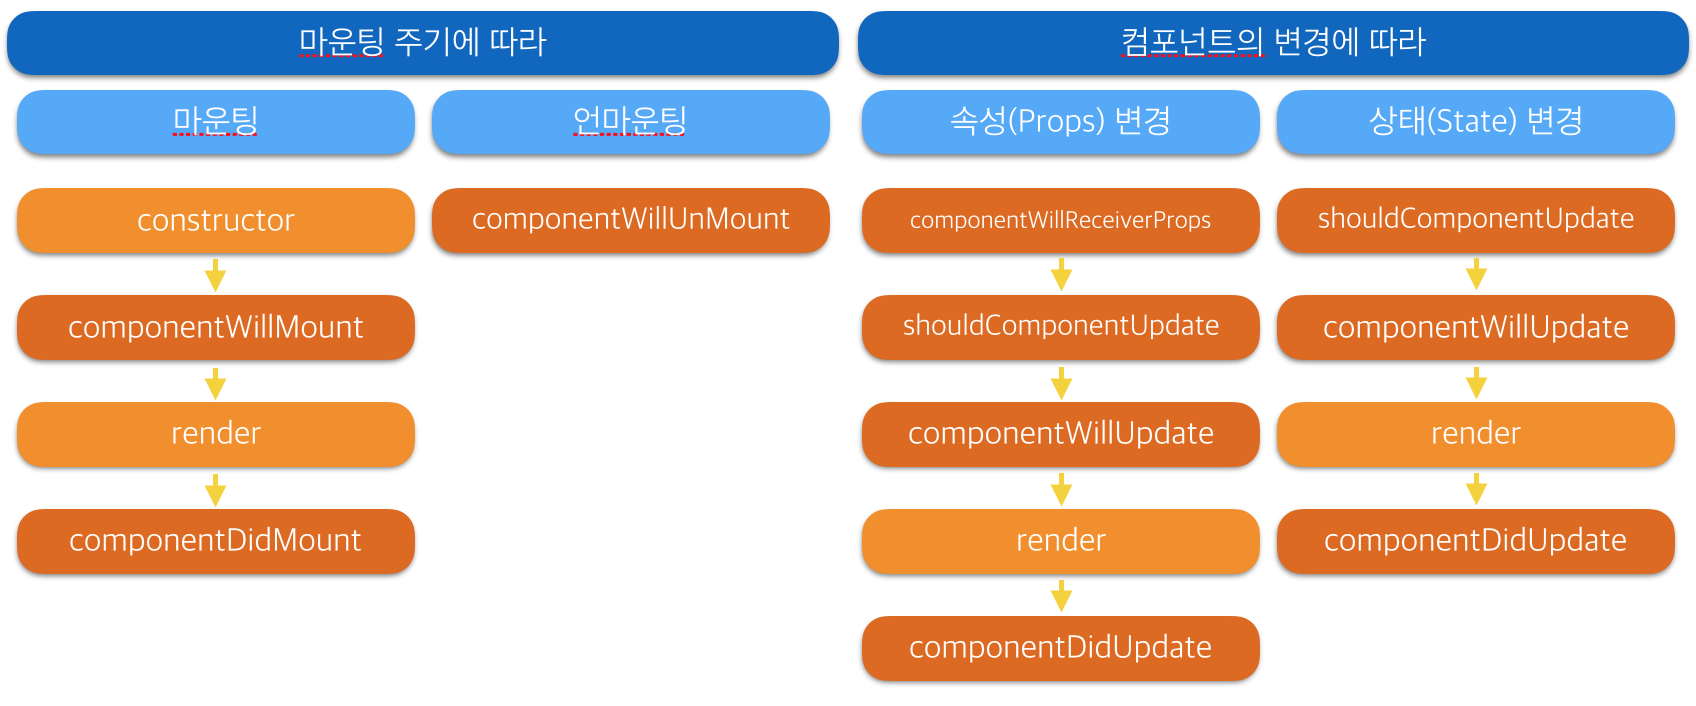
컴포넌트 생애 주기는 컴포넌트가 마운트되거나 갱신될 때 호출 되는 일련의 메서드로 이루어진다. 이런 메서드는 컴포넌트가 UI에 렌더링 되기 전이나 후에 호출된다. 실제로 render 메서드 자체도 컴포넌트 생애주기의 일부다. 하나는 마운팅 생애주기와 갱신 생애 주기 두 가지가 중요하다.
그전에 우리는 컴포넌트에 대한 이해를 정확하게 알고 있는지 확인하자.
Q) 컴포넌트는 무엇인가?
A) 다섯 가지 개념을 마스터 한 다음 리액트를 마스터하라
7.1.1 마운팅 생애주기
잠깐! 왜 Mounting이라고 부르는가? Mounting의 정확한 의미는 무엇일까? what does mount mean in react
마운팅 생애주기는 컴포넌트가 마운트되거나 언마운트되면 호출되는 메서드다. 최초 상태를 설정하거나, API를 호출하거나, 타이머를 시작 또는 종료하거나, 서드 파티 라이브러리를 초기화 하는 등의 작업에 이런 메서드를 사용할 수 있다.
컴포넌트를 만들기 위해서 React.createClass를 사용하느냐 ES6 클래스 구문을 사용하느냐에 따라 마운팅 생애 주기가 약간 달라진다.
| ES6 클래스 | React.createClass() |
|---|---|
| getDefaultProps() | |
| constructor(props) | getInitialState() |
| componentWillMount() | componentWillMount() |
| render() | render() |
| componentDidMount() | componentDidMount() |
| ComponentWillUnmount() | ComponentWillUnmount() |
사실, 생성자는 생애주기 메서드는 아니지만, 컴포넌트 초기화에 생성자를 사용한다. 생성자는 컴포넌트가 마운트 되기 전에 항상 최초로 호출되는 함수이기도 하다.
컴포넌트가 렌더링 되기 전에 setState를 호출하면 갱신 생애주기 메서드가 호출되지 않는다. 렌더링 다음에 setState를 호출하면 갱신 생애 주기 메서드가 호출 된다. componentWillMount 메서드 안에서 비동기 콜백 내부에서 setState를 호출하면, 실제 동작 시점은 렌더링 된 이후이므로 갱신 생애 주기 메서드가 호출 된다.
componentDidMount : 컴포넌트가 렌더링된 직후에 호출 된다.
API요청하기 좋은 메소드이다. 해당 메서드 안에서도 setState를 호출하면, 갱신 생애 주기 메서드가 호출 된다.
DOM을 사용하는 서드 파티 자바스크립트를 초기화 하기에도 좋은 위치이다.
componentWillUnmount: 컴포넌트가 언마운트 되기 직전에 호출된다.
unmountComponentAtNode 함수를 사용하여 명시적으로 언마운트 요청을 할 경우 컴포넌트가 언마운트 된다.
루트 컴포넌트나 부모 컴포넌트에도 사용 가능하다.
자식 있는 부모 컴포넌트를 언마운트하는 경우에는 부모 컴포넌트보다 자식 컴포넌트가 먼저 언마운트되고, 모든 자식 컴포넌트가 언마운트 된 이후에 부모 컴포넌트가 언마운트 된다.
7.1.2 갱신 생애주기
갱신 생애주기는 컴포넌트의 상태가 바뀌거나 부모로부터 새로운 프로퍼티가 도착한 경우에 호출되는 메서드다.
이 생애주기를 사용해 컴포넌트가 갱신되기 전에 자바스크립트를 처리하거나 컴포넌트가 갱신된 후에 DOM에 대한 작업을 수행할 수 있다. 갱신 생애 주기에는 불필요한 갱신을 취소할 수 있기 때문에 어플리케이션의 성능을 향상 시킬 수 있다.
setState가 호출 될 때 마다 갱신 생애주기 메서드가 호출 된다. 따라서 componentWillReceiveProps안에서 바뀐 프로퍼티 값에 따라 상태를 갱신해야 할 때만 setState를 호출한다.
componentWillReceiveProps(nextProps) : 새 프로퍼티가 컴포넌트에 전달된 경우에 호출된다.
shouldComponentUpdate(nextProps, nextState) : 갱신 생애주기 메서드 중에서 꼭 필요한 경우에만 이 메서드를 사용해 컴포넌트를 갱신하면 성능을 향상시킬 수 있다.
componentWillUpdate(nextProps, nextState) : 컴포넌트 갱신 직전에 호출 된다.
componentDidUpdate(prevProps, prevState) : 컴포넌트 갱신이 일어난 직후 render를 호출한 다음에 호출된다.
자식 컴포넌트에 상태를 반드시 추가해야 하는 경우는 자식 컴포넌트 스스로 내부에서 상태를 변경해야 할 때뿐이다.
컴포넌트 내부에서 setState 호출이 필요로 하다면, 상태를 도입해야 하므로 componentWillReceiveProps를 사용해 상태를 바꾸는 것은 정당하다.
하지만, 내부에서 컴포넌트 자신의 상태를 바꾸지 않는다면, 그 컴포넌트에서는 상태를 없애고 부모쪽에서 상태를 관리해야 한다.
7.1.3 React.Children
React.Children은 특정 컴포넌트의 자식들을 다룰 수 있는 방법을 제공한다.
Children.only
const { Children } = React
const { render } = ReactDOM
const Display = ({ ifTruthy=true, children }) =>
(ifTruthy) ?
Children.only(children) :
null
const age = 22
render(
<Display ifTruthy={age >= 21}>
<h1>들어 오세요.</h1>
</Display>,
document.getElementById('react-container')
) const { Children } = React
const { render } = ReactDOM
const findChild = (children, child) =>
Children.toArray(children)
.filter(c => c.type === child )[0]
const WhenTruthy = ({children}) =>
Children.only(children)
const WhenFalsy = ({children}) =>
Children.only(children)
const Display = ({ ifTruthy=true, children }) =>
(ifTruthy) ?
findChild(children, WhenTruthy) :
findChild(children, WhenFalsy)
const age = 19
render(
<Display ifTruthy={age >= 21}>
<WhenTruthy>
<h1>들어 오세요.</h1>
</WhenTruthy>
<WhenFalsy>
<h1>애들은 가!</h1>
</WhenFalsy>
</Display>,
document.getElementById('react-container')
)7.3 High Order Component
HOC로 무엇을 할 수 있을까?
높은 수준의 HOC를 사용하면 다음과 같은 것을 할 수 있다:
코드 재사용, 로직 및 부트스트랩 추상화
Render Highjacking
상태 추상화 및 조작(manipulation)
props 조작(manipulation)
참고 - React Guide
a higher-order component is a function that takes a component and returns a new component.
Whereas a component transforms props into UI, a higher-order component transforms a component into another component.
고차 컴포넌트(HOC)는 리액트 컴포넌트를 인자로 받아서 다른 리액트 컴포넌트를 반환하는 함수일 뿐이다. HOC는 보통 인자로 받은 컴포넌트를 상태를 관리하는 컴포넌트나 다른 기능을 부가하는 컴포넌트로 감싸서 돌려준다. 고차 컴포넌트는 리액트 컴포넌트 사이에서 기능을 재사용하는 가장 좋은 방법이다.
const { Component } = React
const { render } = ReactDOM
class PeopleList extends Component {
constructor(props) {
super(props)
this.state = {
data: [],
loaded: false,
loading: false
}
}
componentWillMount() {
this.setState({loading:true})
fetch('https://randomuser.me/api/?results=10')
.then(response => response.json())
.then(obj => obj.results)
.then(data => this.setState({
loaded: true,
loading: false,
data
}))
}
render() {
const { data, loading, loaded } = this.state
return (loading) ?
<div>데이터 로딩중</div> :
<ol className="people-list">
{data.map((person, i) => {
const {first, last} = person.name
return <li key={i}>{first} {last}</li>
})}
</ol>
}
}
render(
<PeopleList />,
document.getElementById('react-container')
)HOC를 사용하면 컴포넌트를 다른 컴포넌트로 감쌀 수 있다. 부모 컴포넌트는 합성된 결과 컴포넌트에 프로퍼티로 전달 할 수 있는 기능을 제공하거나 상태를 관리한다. 합성된 컴포넌트는 부모 컴포넌트가 제공하는 프로퍼티 이름이나 메서드 이름 외의 정보는 필요하지 않다. 즉, 합성된 컴포넌트는 HOC의 구현을 알 필요가 없다.
const { Component } = React
const { render } = ReactDOM
const DataComponent = (ComposedComponent, url) =>
class DataComponent extends Component {
constructor(props) {
super(props)
this.state = {
data: [],
loading: false,
loaded: false
}
}
componentWillMount() {
this.setState({loading:true})
fetch(url)
.then(response => response.json())
.then(data => this.setState({
loaded: true,
loading: false,
data
}))
}
render() {
return (
<div className="data-component">
{(this.state.loading) ?
<div>데이터 로딩중</div> :
<ComposedComponent {this.state}
{this.props} />}
</div>
)
}
}
const PeopleList = ({data}) =>
<ol className="people-list">
{data.results.map((person, i) => {
const {first, last} = person.name
return <li key={i}>{first} {last}</li>
})}
</ol>
const RandomMeUsers = DataComponent(
PeopleList,
"https://randomuser.me/api?results=10"
)
render(
<RandomMeUsers />,
document.getElementById('react-container')
) const { Component } = React
const { render } = ReactDOM
//DataComponent는 실제로 Function이라는 것을 기억해야 한다. 모든 고차 컴포넌트는 함수다.
const DataComponent = (ComposedComponent, url) =>
class DataComponent extends Component {
constructor(props) {
super(props)
this.state = {
data: [],
loading: false,
loaded: false
}
}
componentWillMount() {
this.setState({loading:true})
fetch(url)
.then(response => response.json())
.then(data => this.setState({
loaded: true,
loading: false,
data
}))
}
render() {
return (
<div className="data-component">
{(this.state.loading) ?
<div>데이터 로딩중</div> :
//HOC가 전달받은 프로퍼티를 합성 대상 컴포넌트에 넘기고 있다.
<ComposedComponent {this.state}
{this.props} />}
</div>
)
}
}
const CountryNames = ({data, selected=""}) =>
<select className="people-list" defaultValue={selected}>
{data.map(({name}, i) =>
<option key={i} value={name}>{name}</option>
)}
</select>
const CountryDropDown = DataComponent(
CountryNames,
"https://restcountries.eu/rest/v1/all"
)
render(
<CountryDropDown selected="United States" />,
document.getElementById('react-container')
) const { Component } = React
const { render } = ReactDOM
const Expandable = ComposedComponent =>
class Expandable extends Component {
constructor(props) {
super(props)
const collapsed = (props.hidden && props.hidden === true) ? true : false
this.state = {collapsed}
this.expandCollapse = this.expandCollapse.bind(this)
}
expandCollapse() {
this.setState(prevState => ({
collapsed: !prevState.collapsed
}))
}
render() {
return <ComposedComponent
expandCollapse={this.expandCollapse}
{this.state}
{this.props} />
}
}
const Letter = XRegExp('\\pL','g') // 유니코드 문자클래스(\pL), global 옵션
const ShowHideMessage = ({children, collapsed, expandCollapse}) =>
<p onClick={expandCollapse}>
{(collapsed) ?
children.replace(Letter, "x") :
children}
</p>
const HiddenMessage = Expandable(ShowHideMessage)
render(
<HiddenMessage hidden={true}>이 메시지는 처음에 숨겨져 있습니다.</HiddenMessage>,
document.getElementById('react-container')
) const { Component } = React
const { render } = ReactDOM
const Expandable = ComposedComponent =>
class Expandable extends Component {
constructor(props) {
super(props)
const collapsed = (props.hidden && props.hidden === true) ? true : false
this.state = {collapsed}
this.expandCollapse = this.expandCollapse.bind(this)
}
expandCollapse() {
this.setState(prevState => ({
collapsed: !prevState.collapsed
}))
}
render() {
return <ComposedComponent
expandCollapse={this.expandCollapse}
{this.state}
{this.props} />
}
}
class MenuButton extends Component {
componentWillReceiveProps(nextProps) {
const collapsed = (nextProps.collapsed && nextProps.collapsed === true) ? true : false
this.setState({collapsed})
}
render() {
const {children, collapsed, txt, expandCollapse} = this.props
return (
<div className="pop-button">
<button onClick={expandCollapse}>{txt}</button>
{(!collapsed) ?
<div className="pop-up">
{children}
</div> :
""
}
</div>
)
}
}
const PopUpButton = Expandable(MenuButton)
render(
<PopUpButton hidden={true} txt="toggle popup">
<h1>숨겨진 컨텐트</h1>
<p>이 컨텐트는 처음에 숨겨져 있습니다.</p>
</PopUpButton>,
document.getElementById('react-container')
)7.4 리액트 밖에서 상태 관리하기
리액틔 기본 상태 관리 기능만 사용해도 어플리케이션을 개발 할 수 있다. 하지만, 어플리케이션의 규모가 커질 경우 문제가 발생하기 시작한다. 상태를 리액트 밖에서 관리하면 리액트에 존재하는 클래스 컴포넌트의 필요성이 줄어든다는 장점이 있다.
상태를 사용하지 않으면, 대부분의 컴포넌트를 상태가 없는 컴포넌트로 만들 수 있다. 클래스를 만들어야 하는 경우는 LifeCycle 관련 함수를 사용해야 하는 경우뿐이어야 한다. LifeCycle 관련 함수를 사용하는 경우에도 클래스의 기능을 HOC에 격리시키고 UI에 들어있는 컴포넌트를 가능하면 상태가 없게 만들어야 한다. 상태가 없는 함수형 컴포넌트는 이해하고 테스트 하기 쉽다.
리액트 밖에서 상태를 관리하면 많은 부분이 달라진다. 전역 변수나 localStorage안에 상태를 넣고 순수 자바스크립트를 활용해 상태를 관리 할 수도 있다. 상태를 리액트 밖에서 처리한다는 말은 어플리케이션 안에서 리액트 상태나setState를 전혀 사용하지 않는다는 뜻이다.
7.5 Flux
플럭스는 데이터 흐름을 단방향으로 유지하기 위해 facebook에서 설계한 디자인 패턴의 종류이다. 플럭스가 만들어지기 전까지는 다양한 MVC 디자인 패턴이 웹 개발 아키텍처를 주도 했었다. 이에 반하는 플럭스는 전혀 다른 디자인 패턴으로 함수형 접근 방법을 보여준다.
Facebook은 대규모 코드베이스에서 MVC 패턴으로 인한 문제를 해결하기 위해 Flux와 함께 나섰습니다. 그들은 조치가 예측할 수 없는 결과를 초래하는 계단식 업데이트 및 디버그하기 어려운 코드를 유발한 문제로 어려움을 겪었습니다.
나의 충고는 Flux와 MVC 사이의 공통점을 찾는 시도를 피하는 것입니다. 혼란을 줄이는 것 외에는 별로 도움이 되지 않을 것입니다. Flux는 사물을 다르게 해결하려고 시도하고 그것을 다른 패턴과 비교하려고 시도해도 도움이 되지 않습니다.
react와 flux는 함수형 자바스크립트와 어떤 관계가 있을까?
상태가 없는 함수형 컴포넌트는 컴포넌트의 내용이나 구성 방식을 표현하는 프로퍼티를 입력으로 받아서 UI엘리먼트를 출력한다. React Class도 마찬가지로 상태나 프로퍼티를 입력으로 받아서 UI 엘리먼트를 만든다. 여러 리액트 컴포넌트를 한 컴포넌트로 조합할 수 있다. 이런 컴포넌트에 변경 불가능한 데이터를 입력으로 전달하면 UI 엘리먼트가 반환된다.
const CountDown = ({count} => <h1>{count}</h1>;플럭스는 리액트가 작동하는 방식을 보완하는 웹 어플리케이션의 아키텍처를 잡는 방법을 제공한다. 플럭스는 리액트가 UI를 만들기 위해 사용하는 데이터를 공급할 방법을 제공한다.

플럭스는 어플리케이션 상태 데이터를 store에 저장해서 리액트 밖에서 관리한다. store는 데이터를 저장하고 변경하며 플럭스 내부에서 뷰를 갱신할 수 있는 유일한 존재이다.
플럭스의 액션과 상태 데이터는 변경 불가능하다. 액션은 뷰로부터 디스패치되거나 웹 서버등 다른 곳으로부터 도착할 수 있다. 변경이 일어나려면 액션이 필요로 하다. 모든 액션은 변경 명령을 제공한다.
7.5.1 뷰
상태가 없는 리액트 컴포넌트이며, 플럭스는 어플리케이션 상태를 우리 대신 관리해준다. 따라서 생애주기 함수를 사용할 필요가 없을 경우 클래스 컴포넌트를 만들 필요가 없다.
const Countdown = ({count, tick, reset}) => {
    if(count) {
        setTimeout(() => tick(), 1000)
    }
    return (count) ?
        <h1>{count}</h1>
        <div onclick={()=> reset(10)}>
            <span>축하합니다</span>
            <span>(처음부터 다시 시작하려면 클릭하세요)</span>
        </div>
}
7.5.2 액션과 액션 생성기
액션은 스토어가 상태를 변경할 때 사용할 명령과 데이터를 제공한다. 액션 생성기는 액션을 만들 때 필요한 이것 저것을 추상화해주는 함수이다. 액션 자체는 type이라는 필드만 들어 있으면 되는 객체일 뿐이다. 액션의 type은 그 액션의 유형을 알려주는 문자열이며 보통은 대문자로만 이루어진다.
액션은 스토어에 필요한 정보를 담을 수 있다.
const countdownActions = dispatcher =>
    ({
        tick(currenctCount) {
            dispatcher.handleAction({ type: 'TICK' })
        },
        reset(count) {
            dispatcher.handleAction({type: 'RESET', count})
        }
     })
7.5.3 디스패처
디스패처는 오직 하나만 존재하며, 플럭스 디자인 패턴에서 관리자 역할을 한다고 생각하면 된다.
디스패처의 역할은 액션을 받아서 해당 액션이 어디에서 만들어진 것이지에 대한 정보를 덧붙여서 액션을 적절한 스토어로 보낸다.
  class CountdownDispatcher extends Dispatcher {
    handleAction(action) {
      console.log('dispatching action:', action)
      this.dispatch({
        source: 'VIEW_ACTION',
        action
      })
    }
  }
facebook에서 Dispatcher class를 공개 했는데, 해당 디스패처를 사용하는 것이 좋다.
7.5.4 스토어
스토어는 어플리케션의 로직과 상태 정보를 담는 객체다. 스토어의 현재 상태 데이터는 프로퍼티를 통해 얻을 수 있다. 스토어가 상태 데이터를 변경하기 위해 필요한 모든 정보는 액션 안에 들어 있다. 스토어는 타입에 따라 액션을 처리하고 액션을 처리하면서 상태를 적절히 갱신한다. 데이터가 바뀌면 스토어는 이벤트를 발생시켜서 자신을 구독하는 뷰에 데이터가 변경되었다는 사실을 통지한다.
class CountdownStore extends EventEmitter {
    constructor(count=5, dispatcher) {
      super()
      this._count = count
      this.dispatcherIndex = dispatcher.register(
        this.dispatch.bind(this)
      )
    }

    get count() {
      return this._count
    }

    dispatch(payload) {
      const { type, count } = payload.action
      switch(type) {
        case "TICK":
          this._count = this._count - 1
          this.emit("TICK", this._count)
          return true
        case "RESET":
          this._count = count
          this.emit("RESET", this._count)
          return true
      }
    }
  }
7.5.5 함께 합치기
const appDispatcher = new CountdownDispatcher()
const actions = countdownActions(appDispatcher)
const store = new CountdownStore(10, appDispatcher)
const render = count => ReactDOM.render(
<Countdown count={count} {actions} />,
document.getElementById('react-container')
)
store.on("TICK", () => render(store.count))
store.on("RESET", () => render(store.count))
render(store.count)참고
'프로그래밍 > JavaScript' 카테고리의 다른 글
| [React] yarn build fail - query-string 모듈이 문제일 때 해결 방법 (0) | 2018.09.28 |
|---|---|
| [정리] 러닝 리액트 11장 - React Router (0) | 2018.07.14 |
| [정리] 러닝 리액트 3장 함수형 프로그래밍 (0) | 2018.05.10 |
| [정리] 러닝 리액트 - 2장 최신 자바스크립트 (0) | 2018.04.18 |
| Currying에 대해 알아보자. (1) | 2018.02.08 |